Three-Color Slipped-Stitch Cowl
Download PDF Version here: ThreeColorCowl-Pattern PDF
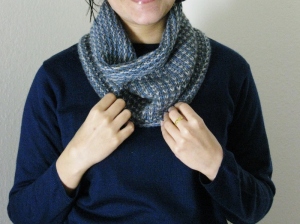
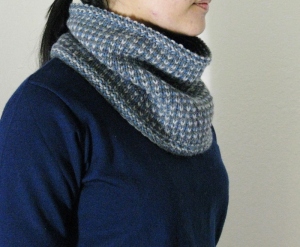
This cowl uses three colors of worsted weight yarn. It is worked flat in a six-row, slipped-stitch pattern, and seamed. You knit from the bottom up, changing colors every row, but using only one color across one row.
Casting on loosely is recommended because you start slipping stitches on the very first row after casting on. The lower border and body of the cowl are knit using US size 9 needles (or size needed to get gauge). For the top border, you switch to smaller needles.
The cowl is shaped with decreases on three rows on its lower half. You decrease 8 stitches evenly on rows 13, 19 and 25 – going down from a total of 123 stitches to 99 stitches. [I could not do this completely unobtrusively because of the color changes, but that doesn’t bother me because the slight staggering of stitches isn’t noticeable when I put on the cowl. The pattern includes instructions for decreasing (the way I did) but if you know of another method to achieve cleaner decrease lines, you could use that instead].
Abbreviations:
- MC – Main Color
- CC1 – Contrast Color 1
- CC2 – Contrast Color 2
- sl1 – slip 1
- wyif – with yarn in front
- wyib – with Yarn in back
- pm – Place Marker
- sm – Slip Marker
- ssk – Slip, Slip, Knit the 2 slipped stitches together
- k2tog – Knit 2 together
Finished Dimensions:
- Circumference – 21.5” (top edge), 26.5” (bottom edge)
- Height – 8.5” to 9.5” (depending on the number of pattern repeats you choose to do)
Yarn Requirements:
- 90-100 yards (40-50 g) of worsted weight yarn in the main color
- 70-80 yards (30-40 g) of worsted weight yarn in the first contrast color
- 70-80 yards (30-40 g) of worsted weight yarn in the second contrast color
For the samples in the pictures above, I used the Patons Classic Wool and KnitPicks WotA.
- In the Green-Red-Blue scarf, green is the main color (MC), red is the first contrast color (CC1), and blue is the second contrast color (CC2).
- In the Grey-Blue scarf, dark grey is the main color (MC), light grey is the first contrast color (CC1) and blue is the second contrast color (CC2).
Needles:
- 24-inch (or longer) US size 9 circular needle (for cowl body)
- 24-inch (or longer) US size 7 circular needle (for top border)
- 24-inch (or longer) US size 10 circular needle (for casting on loosely)
Notions:
- 1 tapestry needle for seaming and weaving in ends
- 8 stitch markers
Gauge (in main pattern stitch after blocking):
- Approx. 4.5 stitches and 8 rows per inch
Slipped Stitch Pattern (worked over an odd number of stitches):
- Row 1 – RS (in CC1) – *sl1, k1, repeat from *, ending with a sl1
- Row 2 – WS (in CC2) – *p1, sl1, repeat from *, ending with a p1
- Row 3 – RS (in MC) – knit all stitches
- Row 4 – WS (in CC1) – *sl1, p1, repeat from *, ending with a sl1
- Row 5 – RS (in CC2) – *k1, sl1, repeat from *, ending with a k1
- Row 6 – WS (in MC) – purl all stitches
Repeat rows 1-6 for slipped stitch pattern
- When slipping stitches, make sure the yarn is always on the wrong side of the work. On the right side of the work, stitches are slipped wyib; on the wrong side of the work, stitches are slipped wyif. All stitches are slipped purlwise.
Cowl Pattern:
Using the main color (MC), loosely cast on 123 stitches.
Lower border:
- Row 1 – RS (using CC1) – *k1, sl1, repeat from *, ending with a k1
- Row 2 – WS (using CC2) – knit all stitches
- Row 3 – RS (using MC) – *k1, sl1, repeat from *, ending with a k1
- Row 4 – WS (using CC1) – knit all stitches
- Row 5 – RS (using CC2) – *k1, sl1, repeat from *, ending with a k1
- Row 6 – WS (using MC) – knit all stitches
These first 6 rows form the lower border of the cowl.
Main body of cowl:
The following rows 7 to 12 form the pattern repeat for the main body of the cowl. The first and last stitches of every row are selvage stitches, and are knit. All the stitches between the first and last stitch are worked in the pattern stitch.
***Please note that on row 12, you need to place markers for decreasing.
- Row 7- RS (using CC1)– *k1, sl1, repeat from * to the last stitch, end with k1
- Row 8- WS (using CC2)– k1, *p1, sl1, repeat from * to the last 2 stitches, end with p1, k1
- Row 9- RS (using MC)– knit all stitches
- Row 10- WS (using CC1)– k1, *sl1, p1, repeat from * to the last 2 stitches, end with sl1, k1
- Row 11- RS (using CC2 – k2, *sl1, k1, repeat from * to the last 3 stitches, end with sl1, k2
- Row 12- WS (using MC)– k1, purl all stitches to the last stitch, end with k1
Repeat rows 7-12 eight or nine more times, or till you get your desired height for the cowl body, making decreases at the same time. Decrease eight stitches each on rows 13, 19 and 25 (the first rows of the second, third and fourth pattern repeats) evenly. A total of 24 stitches are to be decreased.
This is how I worked the decreases:
***On row 12:- k1, p5, [pm, p15] 3 times, pm, p21, [pm, p15] 3 times, pm, p5, k1
First decrease row – On row 13:- [knit in pattern to the marker, sm, ssk] 4 times; [knit in pattern to 2 stitches before the next marker, k2tog, sm] 4 times, knit in pattern to the end of the row. You now have 115 stitches remaining on the needle.
Knit rows 14-18 in pattern.
Second decrease row – On row 19:- [knit in pattern to the marker, sm, ssk; knit in pattern to the next marker, sm, sl1, ssk] 2 times; [knit in pattern to 3 stitches before the next marker, k2tog, sl1, sm; knit in pattern to 2 stitches before the next marker, k2tog, sm] 2 times, knit in pattern to the end of the row.
You now have 107 stitches remaining on the needle.
Knit rows 20-24 in pattern.
Third decrease row – On row 25:- [Knit in pattern to the marker, SM, ssk] 4 times; [knit in pattern to 2 stitches before the next marker, k2tog, SM] 4 times, knit in pattern to the end of the row.
You now have 99 stitches remaining on the needle.
Knit the next 5 rows of the pattern.
Repeat rows 7 to 12 five or six more times (total 9 or 10 repeats of stitch pattern) or until your cowl is about half an inch shorter than the height you want, ending with the last row of pattern stitch on a WS row.
Top border:
For the top border, switch to size 7 needles (or size 6 if you want the cowl to fit closer around your neck at the top).
- RS – Using CC1, *k1,sl1, repeat from * to the end of the row, ending with a k1
- WS – Using CC2, knit all stitches
- RS – Using MC, *K1, sl1, repeat from * to the end of the row, ending with a k1
- WS – Using CC1, knit all stitches
- RS – Using CC2, *k1, sl1, repeat from * to the end of the row, ending with a k1
WS – Using MC, bind off all stitches knitwise.
Block the un-seamed cowl to desired measurements.
Seam the left and right edges of the piece, weave in ends.
Sheesha
(Many thanks to Barbara for pointing out an error in the pattern and correcting it – Nov 26, 2013)
(Thanks SO much, Elizabeth, for pointing out an error in the pattern and correcting it – Feb 22, 2014)
Download PDF version here: Sheesha Pattern PDF
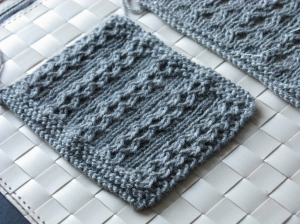
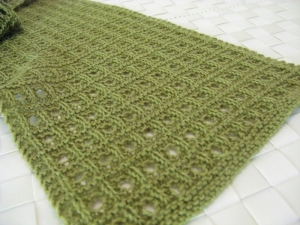
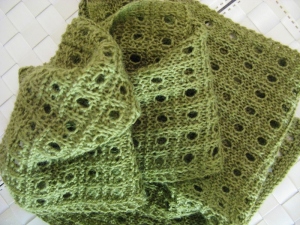
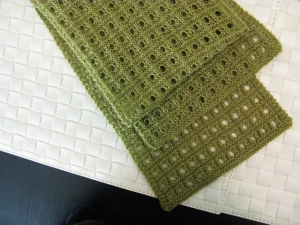
This scarf combines lace and texture in a simple, grid-like pattern. You just replace the center stitch in every little box of the grid with a yarn over. It’s a six-row repeat worked over a multiple of 4 stitches, plus 1 (not including border stitches).
You will need 350-400 yards or about a hundred grams of fingering weight yarn to get a light scarf.
(You can cast on more stitches if you want a wider scarf or stole, in which case you will need more yarn. Another possibility is to omit the garter rows at the beginning and end, and seam the ends together to make a cowl.)
Finished dimensions (after blocking):
9” wide, 51” long
(At 51 inches, my scarf is shorter than the ideal scarf length. You might want to work 6-7 more repeats of the 6-row pattern if you want a longer scarf.)
Yarn requirements:
About 350-400 yards or hundred grams of fingering weight yarn. The exact yardage will vary depending on your gauge and how long you knit the scarf.
(I used approximately 350-360 yards of LB 1878 by Lion Brand).
Needles:
A pair of US size 7 or 4.5 mm needles for the knitting.
Optional: A pair of US size 8 / 9 or 5 / 5.5 mm needles for casting on and binding off loosely, if required.
Gauge (In pattern stitch, after blocking):
Measured over 4 inches: 23 stitches and 25 rows
Per inch: 5.75 stitches and 6.25 rows
Stitch Pattern (worked over a multiple of 4 stitches + 1):
- Row 1 (RS) : knit all stitches
- Row 2 (WS) : *p1, k3, repeat from *, ending with a p1
- Row 3 (RS) : *k1, p2tog, yo, p1, repeat from *, ending with a k1
- Row 4 (WS) : same as row 2
- Row 5 (RS) : knit all stitches
- Row 6 (WS) : knit all stitches
Repeat rows 1-6 for pattern.
Scarf Pattern:
Loosely cast on 51 stitches. (I use the long-tail method and a larger needle size to cast on)
- Rows 1-4: Knit all stitches (garter stitch)
[From here on, you knit the first 3 and last 3 stitches of every row (maintaining a garter stitch border), and knit in pattern stitch over the center 45 stitches]
- Row 5 (RS): Knit all stitches
- Row 6 (WS): k3, *P1, k3, repeat from *, till you have 4 stitches remaining on the needle, p1. Knit the last 3 border stitches.
- Row 7 (RS): k3, *k1, p2tog, YO, p1, repeat from *, till you have 4 stitches remaining on the needle. Knit the last 4 stitches
- Row 8 (WS): Same as row 6
- Row 9 (RS): Knit all stitches
- Row 10 (WS): Knit all stitches
- Repeat rows 5-10 fifty-one more times, or till scarf is desired length, ending with the last row of the pattern stitch on a wrong side row.
- Knit the next 3 rows.
(These 3 rows, along with the last 2 rows of the pattern stitch, which are knit rows make up the garter stitch border).
Loosely bind off all stitches (knitwise on WS). Weave in ends.
Block to desired dimensions.
Jhumka
Download PDF version o the pattern here: Jhumka PDF (to download and print)
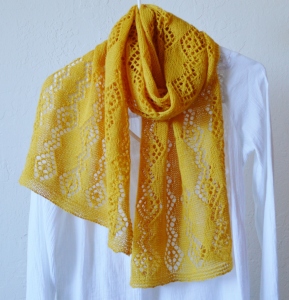
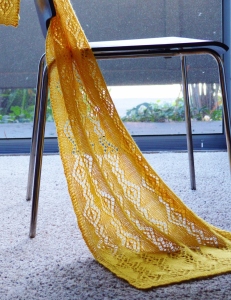
Jhumka, which means earring (dangler) in Hindi / Urdu, is a rectangular shawl featuring a lace pattern worked over a multiple of 22 stitches and 28 rows. You cast on a total of 74 stitches, including 66 main pattern stitches (22 x 3) in the center and 8 border stitches – 4 on either side. The shawl can be made wider or narrower, longer or shorter by adding or leaving out one or more pattern repeats.
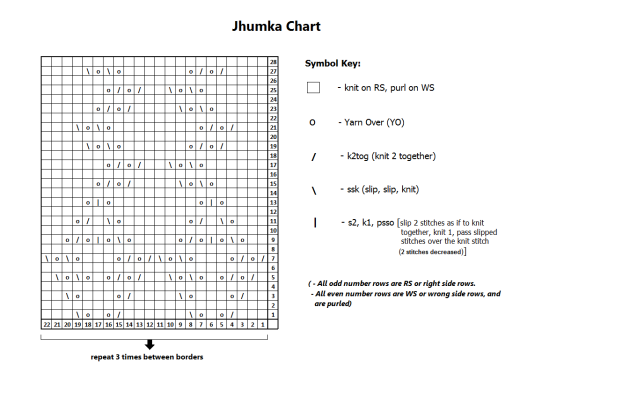
The pattern includes both a chart and written instructions.
Yarn
– I used approx. 2 skeins or 550 yards of the Cascade 220 Fingering in the Goldenrod colorway.
Needles
– A pair of US size 6 (4 mm) needles for knitting
– US size 8 (5 mm) needle for casting on loosely (optional)
Notions:
– 2-4 Stitch markers (if using)
– Blocking pins / wires
– Tapestry needle to weave in ends
Gauge (after blocking)
– 20.5 stitches and 27 rows = 4 inches, measured over the Jhumka lace pattern
Finished dimensions
– 14.5 inches wide and 61 inches long
Abbreviations:
- RS – Right side
- WS – Wrong side
- YO – yarn over
- k2tog – Knit 2 together
- ssk – slip, slip, knit the 2 slipped stitches together
- (s2, k1, psso) – slip two stitches together as if to knit; knit 1 stitch; pass slipped stitches over the knit stitch (2 stitches decreased)
Jhumka stitch pattern (worked over multiples of 22 stitches and 28 rows):
(Note: Rows 1- 14, that make up the diamonds in the pattern, can be further broken down into smaller 11- stitch repeats, but I have not done that and have written all rows as 22-stitch repeats to maintain consistency. Please refer to the chart for more clarity.)
- Row 1 (RS) – *k3, k2tog, YO, k1, YO, ssk, k6, k2tog, YO, k1, YO, ssk, k3*, repeat from * to * for pattern
- Row 2 (WS) and all WS rows – purl all stitches
- Row 3 – *k2, k2tog, YO, K3, YO, ssk, k4, k2tog, YO, k3, YO, ssk, k2*, repeat from * to *
- Row 5 – *k1, (k2tog, YO) twice, k1, (YO, ssk) twice, k2, (k2tog, YO) twice, k1, (YO, ssk) twice, k1*, repeat from * to *
- Row 7 – *[(k2tog, YO) twice, k3, (YO, ssk) twice] repeat twice *, repeat from * to *
- Row 9 – *k2, YO, ssk, YO, (s2, k1, psso), YO, k2tog, YO, k4, YO, ssk, YO, (s2, k1, psso), YO, k2tog, YO, k2 *, repeat from * to *
- Row 11 – *k3, YO, ssk, k1, k2tog, YO, k6, YO, ssk, k1, k2tog, YO, k3*, repeat from * to *
- Row 13 – *k4, YO, (s2, k1, psso), YO, k8, YO, (s2, k1, psso), YO, k4*, repeat from * to *
- Row 15 – *k5, (YO, ssk) twice, k4, (k2tog, YO) twice, k5*, repeat from * to *
- Row 17 – *k6, (YO, ssk) twice, k2, (k2tog, YO) twice, k6*, repeat from * to *
- Row 19 – *k4, (k2tog, YO) twice, k6, (YO, ssk) twice. k4*, repeat from * to *
- Row 21 – *k3, (k2tog, YO) twice, k8, (YO, ssk) twice, k3*, repeat from * to *
- Row 23 – same as row 15
- Row 25 – same as row 17
- Row 27 – same as row 19
- Row 28 (WS) – purl all stitches
Repeat rows 1 to 28 for pattern
Pattern Instructions:
- Loosely cast on 74 stitches using the larger needle (if using). I used the long-tail method to cast on.
- Switch to smaller needles. Knit 7 rows.
- On row 8 (WS), knit 4 stitches, purl 66 stitches, knit the last 4 stitches.
From this point on, the first and last 4 stitches will always be knit to form a garter stitch border, and the Jhumka stitch pattern will be worked over the center 66 stitches (22 x 3).
Stole body:
- On row 9 (RS), knit 4 stitches; work row 1 of the Jhumka chart /stitch pattern 3 times (placing stitch markers between every repeat if you want); knit the last 4 stitches.
- On the next row (WS), knit 4 stitches; purl 66; knit the last 4 stitches (all WS rows are worked this way).
- Continue, as above, to knit rows 3 to 28 of the Jhumka pattern, maintaining a garter stitch border throughout.
Repeat rows 1 to 28 of the Jhumka stitch pattern a total of 14 times. Then knit rows 1 – 14 of the pattern once more (ending with row 14 – a WS row).
(You can work fewer or more repeats of the pattern to make the stole shorter or longer. Just remember to end with row 14.)
To finish:
- Knit 7 rows
- Loosely bind off all stitches knitwise (on the WS).
- Block to desired measurements. Weave in ends.
