

Download PDF version of pattern
Imaarat is a simple architecture-inspired lace scarf with side-to-side construction. The lace is worked on odd number rows only, and all even number rows are knitted.
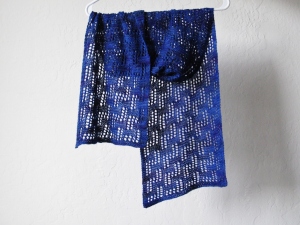
The scarf is knit in one piece – the first half (from the cast on edge to the center) is worked using K2TOGs and yarn-overs (Imaarat Stitch Pattern A) and leans naturally towards the left. The second half (from the center to the bind-off edge) is worked using SSKs and yarn overs (Imaarat Stitch Pattern B), and leans towards the right. This natural slant towards the left and then the right creates the shallow V shape seen in the pictures.
Both the front and back of the scarf look good, but I prefer the side on which you’re knitting all stitches (which would otherwise be the back of your work).
Yarn – One skein of Cascade Heritage Solids (or Paints) or 430-460 yards of any fingering weight yarn that blocks well. I used one skein of the Cascade Heritage Paints in the “Isle of Skye” colorway.
[A number of knitters who’ve knit this scarf since the design was first released feel that the stitch pattern would show better in a solid-color yarn, which means that the Cascade Heritage Solids, or any solid colored fingering weight yarn might be a better choice than a variegated one]
Happy knitting! 🙂
Needles:
- US size 6 (4 mm) for knitting
- US size 8 (5 mm) for casting on loosely (optional).
Notions:
- Tapestry needle to weave in ends
- 6 stitch markers (if using)
- Blocking pins (and wires, if using)
Gauge (after blocking) :
- 4 inches = 23.2 stitches and 25 rows
Finished Dimensions:
- Length – 55 inches, Width – 10.5 inches
Abbreviations:
- yo – yarn over
- k2tog – knit 2 together
- ssk – slip, slip, knit
- PM – place marker
- SM – slip marker
Imaarat Stitch Pattern A (for first half) – worked over a multiple of 11 stitches and 16 rows
- Row 1 – *(k2tog, yo) twice, knit 7 stitches*, repeat from * to *
- Row 2 and all even number rows – knit all stitches
- Row 3 – same as row 1
- Row 5 – same as row 1
- Row 7 – *(k2tog, yo) 5 times, knit 1*, repeat from * to *
- Row 9 – same as row 7
- Row 11 – *knit 6 stitches, (k2tog, yo) twice, knit 1*, repeat from * to *
- Row 13 – same as row 11
- Row 15 – same as row 11
- Row 16 – knit all stitches
Imaarat Stitch Pattern B (for second half) – worked over a multiple of 11 stitches and 16 rows
- Row 1 – *knit 7 stitches, (YO, ssk) twice*, repeat from * to *
- Row 2 and all even number rows – knit all stitches
- Row 3 – same as Row 1
- Row 5 – same as Row 1
- Row 7 – *knit 1, (YO, ssk) 5 times*, repeat from * to *
- Row 9 – same as Row 7
- Row 11 – *knit 1, (YO, ssk) twice, knit 6 stitches*, repeat from * to *
- Row 13 – same as row 11
- Row 15 same as row 11
- Row 16 – knit all stitches

Instructions to knit the scarf:
First half of the scarf (uses Stitch Pattern A / Chart A):
Loosely cast on 61 stitches (55 pattern stitches and 6 border stitches – 3 on either side) using the larger needle.
Switch to smaller needles.
- Knit 6 rows
- Row 7 – knit 3 stitches, place marker (PM); work row 7 of Chart / Stitch Pattern A five times, placing markers after every repeat; knit the last 3 stitches. 6 markers placed.
(Note that you begin working the lace stitches with row 7 of Imaarat Stitch Pattern A or Imaarat Chart A) - On the next row (and all even number rows) knit all stitches, slipping markers as you go.
- On the next row, knit 3 stitches, SM; work row 9 of Pattern A five times, slipping markers as you go; knit the last 3 stitches.
- Next row – knit all stitches.
- Continue to work rows 11 to 16 of Pattern A as above, between the garter stitch borders.
- Now work rows 1 to 16 of Pattern A ten times (working 5 repeats between borders on every row, as established), ending with row 16 of the pattern.
Center:
- Knit 2 rows (knit all stitches). These two rows mark the center of the scarf.
Second half of the scarf (uses Stitch Pattern B / Chart B):
- On the next row, knit 3 stitches; work row 1 of Stitch Pattern / Chart B five times (separated by markers); knit the last 3 stitches
- On the next row, knit all stitches
- Continue to knit rows 3 to 16 of Pattern B as above, while maintaining a garter stitch border
- Repeat rows 1-16 of Pattern B nine more times.
- To finish, knit rows 1 to 10 of Pattern B once more (ending with row 10).
Knit 5 more rows.
Bind off all stitches purlwise.
Block to desired measurements, using the natural slant of the fabric as your guide to shape the scarf. Weave in ends.

Thank you so much for the beautiful pattern.
(Love the blue, by the way.)
🙂
You’re very welcome, Claudia! I love the colorway too 😀
I’m glad Cascade Yarns posted this on their Facebook page! I’m happy to add you to my Feedly. Beautiful patterns!
Thank you so much! 🙂
Hi Sandhya,
This pattern is gorgeous! I am an editor at AllFreeKnitting.com and would love to feature your tutorial on my site with full credit to you. I’ve noticed you have some other great projects on your site, and I would love to link to any other free knitting patterns you have as well. I know my readers would just love them and in return would generate some nice traffic to your site. If you agree and would like us to feature your project and/or other free projects, our readers will simply click the link to your blog to get your full tutorial. Please let me know if you are interested and would like more information.
Thanks. I look forward to hearing from you!
Hi Katelin,
I’ll be happy to have this pattern, and any others you like, featured on AllFreeKnitting.com. I’m sending you an email.
Thanks so much for your interest!
Sandhya
I just found this pattern on ALLFREEKNITTING, and it is just beautiful. I think it is a must make. Thank you.
Thank you so much, Annette! Hope you enjoy knitting it 🙂
This is so pretty and looks fairly easy for a beginner like me. 🙂
Thanks so much, Debb! It’s very easy to knit – involves no purling, and uses only basic decreases and yarn-overs. Hope you enjoy working on it 🙂
Hi I have been knitting for many many years and have knitted as I thought every stitch there is, until I came across this beautiful stich, I have to try this as it will be a big change, I will try a blanket which I’m sure will be so nice, and for me different. Thank you, Anne O’Gorman
It’s wonderful of you to say that, Anne! Thank you so much 🙂
I’m not sure it would work well for a blanket, though, because the fabric formed by the stitch slants to one side -assuming you’re using only Pattern A for the whole project. So the blanket may not be a perfect square or rectangle but a parallelogram. It’s great if that works for you 🙂
(Here’s a stitch-pattern recommendation for a blanket – https://swatchophile.wordpress.com/2013/11/25/sheesha/
Maybe with thicker yarn and larger needles)
I just love this pattern and I am looking forward to making it on my vacation. Thank you so much for sharing your talent.
Thanks a lot, Mary Ann! Happy knitting 🙂
This is most unusual compared to any other patterns I’ve seen and absolutely gorgeous! Definitely going to make this! Found it from the allfreeknitting/ Knit Picky Patterns site.
Thank you so much, Cynthia! I really hope you enjoy knitting it 🙂
Beautiful pattern. Thank you so much for sharing.
Thanks so much, Linda! 🙂
Why is a knitting pattern posted on the Daily Crocheter?
Hi, Mary. I have no idea!
How many stitches is your cast on to coordinate with suggested yrdg? Love the pattern
Thanks a lot! 🙂
I cast on 61 stitches and used up almost one whole skein of the Cascade Heritage Paints – that’s 437 yards of fingering weight yarn. My scarf is 55 inches long. The exact yardage for you would depend on your gauge and the yarn and needles you’re using. You could also modify it by knitting fewer or more repeats of the stitch pattern. If you have a limited amount of yarn, then weigh it first, and use just under half of it to knit to the center in pattern A (working as many row-wise repeats as your yarn allows), knit the 2 center section rows, and then switch to pattern B and knit the other half. That way, you won’t run out of yarn.
I suggest knitting and blocking a swatch before you begin, both to check gauge, and to see if you like the look of the pattern / fabric. If it’s too loose and you want a firmer fabric, you can switch to a smaller needle size (than what you used to knit the swatch); and if it’s too tight and you want more drape and a looser knit fabric, you can switch to a larger needle size.
Hope that helps! Happy knitting 🙂
So beautiful! Never realised such a lovely pattern could come from simple stitches! So clever!
Thanks so much, Donna! 🙂
I knitted the first hafl with no problem. I don’t understand how it’s possible to have yo’s on the Chart B of the imaarat pattern and no K2tog’s. What keeps the number of stiches from increasing every other row.
Hi,
In Chart B you work your decreases using SSKs (slip, slip, knit). You’re using decreases and YOs in both the first half and the second half of the shawl. Only, in Chart A you use the k2tog decrease method, and in Chart B you use ssk. It’ll be clearer if you look at both charts side by side and compare them 🙂
Here’s a video demonstrating the ssk decrease method (by verypinkknits) that might help – https://www.youtube.com/watch?v=Cg1ykku04is
Happy knitting!
Thanks for a great pattern. I finally worked out that ‘fingering’ is 4ply! I am impressed that you answer every comment. Nice manners. I think the English version of SSK, being sl1 k1 psso (pass slipped stitch over) makes far more sense. Thanks again
Thanks so much for your feedback, Sue! I’ll remember to add “4-ply” to the yarn description the next time I write a pattern that asks for fingering-wt yarn 🙂
Do you knit all of chart A first. Then knit all of chart B ,then sew them together,or do all at one time?
Hi Judith,
Yes, you knit repeats of chart A from the cast on edge to the center of the scarf. Then knit 2 rows (garter stitch). And then switch to doing repeats of chart B till you reach the bind off edge. It’s all done in one piece – no sewing.
Hope that helps!
Happy knitting 🙂
This looks absolutely stunning! I also found the link the through the allfreeknitting/ Knit Picky Patterns site. Definitely going to try this. Sandhya I really appreciate the fact that you responded to all those comments as it cleared up a few questions I would have had and now I feel confident enough to tackle it. And knowing fingering would be 4ply (in South Africa as well as UK) is a bonus point! Thanks so much for sharing this.
Thank you sooo much, Julie! Glad you like it. Happy knitting! 😀
Reblogged this on fpvj.
I made a copy of the pattern as soon as I saw it. Am now considering purchasing yarn, but think I may want it wider. Do you have any pictures of the shawl on a person so I could see how it would be worn if only 10 1/2 inches.
Thank you.
Sure! Here you go
Hope that helped! Happy knitting 🙂
Pingback: Imaarat Jaune – Recreation
I d like to adapt this for a poncho. Using bamboo silk. Possible?
I have this fab yarn and want a lighweight lacy pattern. Thanks
Hi Millie,
There are a few ways to do that (if you mean a simple poncho without shaping), depending on your knitting preferences. If you don’t mind purling, then the simplest solution would be to knit it in the round using the charts to follow the pattern. So cast on x number of sts (multiple of 22), place marker and join to work in the round, work a few rows in garter stitch for the border (knit 1 row, purl 1 row for garter in the round); work half the stitches in pattern A (remember to purl every other row), and half in pattern B, keep going till you get your desired height; work a few plain garter stitch rows, and bind off. If you want to make that even simpler, use only one of the charts, but then your poncho will have a bias – it’ll be more of a parallelogram. To make one end narrower and the other wider, change needle sizes a couple of times before you finish, or just pull an i-cord through one edge to tighten.
If you’d like to follow the pattern as written and then make it a poncho, then you could just cast on more stitches than given for increased width, knit without the beginning and ending borders, and then seam the ends together after you’re done knitting. Or do a provisional cast on if you know how to, and graft in the end.
I hope that helps! I’m not sure about the numbers. That would depend on the circumference you’d like.